Search This Blog

Saturday, January 28, 2012

I need to re-wire this old sewing machine

On so many occasions, I have found myself having to re-wire an entire sewing machine just so I could work on it. The 50+ year old machines usually have at least 1 cord that needs replaced.   That old wire insulation breaks down after time. The even older machines had cloth insulation on the electric cords which is even more dangerous. The wire to the light is the least likely to need replaced but still check it out carefully. The foot controller and power cord usually need to be replaced for safty purposes. The good news is that these older machines can be re-wired fairly easily. Some are easier than others. The light fixtures are the most difficult. It will require some soldering in most cases.  This 1940, Singer model 66 had the splices for the power cord, the light and the foot controller inside the motor mount. Starting with the light on this machine, You have to remove the wire retaining rings to get the fixture open. The glass lens was missing on this fixture.
You just pry the rings off with a small screw driver. This model has a large one at one end and a small one at the other. Once inside, you need to cut the old wire off of the switch contact and the bulb socket.
This will make more sense as you see for your self the old wire and what you must do to install new wire in the fixture. Yes, it can be scary the first time you try this. Just remember, somebody, just like you, put this together back in the old days.  Pictured below is the new wire soldered to the appropriate pieces.
Installing this back into the original fixture can be time consuming. You have to get the wire path just right so the two halves fit back together snug. It may take several tries. I made up several new 4-letter words while attempting this. I will not share my words with anyone. You must make up your own. I did run into one other problem that was not a normal "re-wire" issue. The center bulb contact in the socket had broken off. I had to make a new one. I folded some copper foil I had and slid it down into the slot and then soldered it in. You should not have to do this but this really shows the "do what you gotta do" attitude you must have in dealing with some of these old sewing machines.
 Now for the splicing of the power wire, the foot controller and the light in the motor mount.
 All the new wire is in and just needs to be cleaned up, insulated and tucked in. I used 2-wire nuts and a shrink tube case to protect the splices. Shrink tubing can be wonderful by itself in protecting old wire.I used wire ties to keep the wires from pulling out of the case.
The foot controller is the easiest part to re-wire. Most are easy to open up and replacing the old wire is straight forward. I use wire ties here also to lock the wire inside the controller.
If you made it through this much of this post, you may wonder where I get the new wire for the project. I found that buying cheap extension cords at the thrift store is the least expensive. Try to find some that are flexible and not so stiff. Cut the length that you need and leave the plug on for the power end. There should be enough information here for most people to rewire most of the old machines. This Model 66 was different than most since it spliced in the motor mount instead of the standard, Singer, 3-prong jack/plug. The prongs are numbered if you look close inside and are even color coded. Please be careful. I have blown the circuit breaker on more than one occassion. Click on the diagram below for a larger image. The area inside the shaded "Standard Singer Jack" is exactly the same wiring as the above model 66 motor mount splice. There are some other configurations that include a power recepticle where you plug the light into 1 socket, and the motor into the other. They still wire the same.

Wednesday, January 18, 2012

1925 Singer model 66 treadle gets a face lift

My wife heard me wishing "Out Loud" for a sand blasting cabinet back in early December. Being the super trooper that she is, Christmas Day included a totally unexpected large box, hiding in the guest bedroom with no name on it. I hope it was for me because I immediately claimed it as my own and no one said any different. Over the next several weeks I learned about "Sand Blasting" and just how big a mess you can make. After completely covering the entire garage with a fine, white dust, I have decided that this will be my last Sand Blasting project until it warms up in the spring. Cabinet or not, It should be done out side. Here is what the
cabinet looks like.
Just pour in some special sand, hook it up to your air compressor and commence to making a huge mess. I did have a project in mind. It included a 1925 Singer treadle machine which had a horrible finish. I had bought it for parts and really didn't have anything to lose if I destroyed it. I couldn't take the machine totally apart so I had some prep work to do before it went into the "Blast Cabinet".
I still think that Duct Tape is one of the greatest inventions ever. The sand just bounced right off of it. It worked out well. Below is the naked Singer after 4-1 hour treatments in the Blast Cab.
Now I have to get this primed as fast as I can to protect it from rusting in the 90%, Indiana  humidity. I used standard, spray can paint. A bare metal primer, an automotive gloss, and a clear enamel. Below is several coats of primer and a half dozen coats of the gloss. You may be wondering why I chose WHITE for the Face Lift/restoration project...........
The decals that I am able to produce with my home computer and printer require a white background. It will not work on Black.
In between all the paint sessions, I was looking for ideas for borders and graphics. I also had to match the standard Singer fonts (lettering). I ended up spending quite a bit of money downloading high resolution graphics that I could plug into my Corel Draw program I used for making the "water slide" decals. You can buy ink jet decal paper and it does work if you have the patience. It does not always want to cooperate.
I finally got my decals on but it was a struggle. I had to use some lacquer thinner very carefully to get them to stick. Now for the clear coat. I had a good 8 coats of clear and then I had to "wet sand" the decals with 1200 grit sand paper to get rid of the hump due to the thickness of the decal itself. Then another 6 coats of clear coat, 24 hours of dry time and a day of re-assembly....


 I spent another day just making every thing look right and adjusting it so it sews a Perfect Stitch!


The first sew test.

Sunday, January 1, 2012

Good bye 2011, Hello 2012

Happy New Year!
Just a quick look at what happened in 2011 for me and the sewing machines. I tried to take a picture of every one I worked on but somtimes it just didn't happen. I do know that I bought a box of 100 needles at my training class back in May, and they are gone. I always put a new needle in a serviced machine.
What a great adventure and I sure have learned alot this year. Here are the machines I worked on and got a picture of this past year.

Friday, December 30, 2011

The Big-3 and the little-3

I ran across a brochure that came with one of my recent purchases that I consider to be priceless.
How many times has your sewing machine just decided to stop sewing correctly. It was sewing fine last week, but now, it's doing all kinds of weird things. "What is going on"
I can only speak for myself, but I don't know how many times I just gave up trying to figure out what was going on only to return the next day to find I had missed the simplest little thing.
This brochure was put out by Kenmore, and I would guess, in the mid 60's.
(I hope you can click on the pictures to make them bigger)

Front Cover

 The BIG 3


the little 3


Even though this brochure is specific to a certain style of machine, it can be easily translated to cover any machine. All sewing machines work the same. A bobbin is a bobbin, regardless how it loads or what size it is. Upper tensions may look different, but they all perform the same duty. Next time your machine acts up, calmly go through the above routine and check The Big 3 and the little 3.
Hopefully you will be one of the 8 out of 10 and correct the problem.

Friday, November 25, 2011

The amazing Singer 201

As for the older, classic sewing machines, I have been partial to the Singer 15-91 for quite a while. The big class 15 bobbin. The verticle oscillating hook. The rock solid, all steel construction. They just didn't make them any better.....or did they. Now that I have finally had the chance to play with a model 201, I am having some second thoughts on my favorite, all time, classic machine. Wow. I didn't think that a horizontal, class 66 drop in bobbin, rotary shuttle machine could keep up with the 15-91. I am very impressed. This 1939, model 201, was used so much that it wore the decals off of the front work area. Much of the clearcoat was gone where old oil was allowed to sit and dry. After a good cleaning and oil/grease, this thing ran like a top.
Or should I say "sewing machine". It just shows me how well these machines were built.


Having the same, direct drive "potted" motor as the 15-91, this machine was a pleasure to use on the heavier
materials even though the motor needs to be pulled and cleaned. It just runs slow but still with plenty of power. I did have to replace some of the wiring and reinforce the rest with shrink tube for safety reasons.
This machine is 72 years old.......


Even though it uses the class 66 bobbin, it is not your standard model 66 shuttle.


Standard pre WWII head plate and the model 66 upper tension setup. 


As you can see, unlike the 15-91....No light in back. It has been designed into the front body cavity.


Look at these stitches. I could sew all day long on this machine! I am going to have to play/sew with this machine under  lots of different conditions before I can determine my new favorite, classic machine.

Thursday, November 17, 2011

I thought all sewing machines turned the same direction.

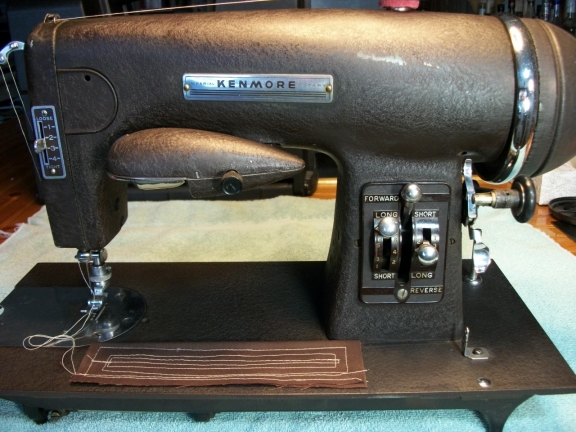
I had heard about a few machines that actually turned backwards from the standard. I finally got to play with one. White sold many in the 1920's and I believe Free Sewing Machine Co. also sold similar products around the same period. Pictured below is a Kenmore model 117.59, bought in 1938 from Sears, Roebuck and Co. (according to the sticker inside the cabinet) Kenmore continued to release upgraded versions of this same machine. The second release being 1942 and they added an extra "1" to the model number (117.591). In the mid 40's, a model 117.959 appeared. The White Sewing Machine Co. manufactured all of the Sears/Kenmore machines from the 30's through the 50's. The Free Sewing machine Co. manufactured the Westinghouse, and the New Home. The main difference was the upper tension. All had a similar setup using a friction drive tire on the motor. And, the hand wheel on all of them must turn Clockwise to sew. The White Sewing Machine Co. was the first to introduce this flat crinkle finish. It was marketed as a non glare finish which was easier on the operator's eyes.
Every one of these machines that I have seen had a flat spot on the motor friction tire from just sitting at that spot for so many years. So if you tried to run the machine, you would get a " thump.....thump......thump" every time the flat spot hit the hand wheel. I actually found a place to order a new one but I just couldn't wait a week to try and sew after spending several hours cleaning and lubricating this old machine.
I cut the old piece of rubber off and then took 24" of electric tape and cut it down the middle lengthwise. I then carefully rolled both 1/4" wide tape strips around the shaft where the old tire was. Wow, It worked!
The motor mount has a spring that keeps pressure on the wheel and like I said, it worked perfect. I could at least do a sew test. It was a challange to figure out how to thread the machine but just following the rule (#1-tension, #2-Take up, #3- needle) and a little common sense, I guess I got it because it sews beautifully.
I guess I never thought about it before, but the motor itself turns the same way that all sewing machine motors turn. Counter-clockwise. If there was a belt involved here, the hand wheel would turn counter-clockwise. Since the motor is directly connected to the hand wheel by the friction tire, it will turn the opposite way, Clockwise, or backwards to what we are used to today.  

Here is a Kenmore model 117.959 - (different Stitch Lever and Light)

Here is a Free Westinghouse Model ARE

Here is a New Home Model NLB


Friday, November 4, 2011

And here is yet another use for that wonderful product...."Duct Tape"

This was probably a "one in a million" event that happened to a sewing machine recently.
Pictured below, is a motor pulley and the air vent for the motor. Some how, a piece of thread from the spool holder, directly above the vent, got sucked into the vent and several yards were tangled up on the motor pulley and belt. This caused the machine to completely stop working. The LCD Screen showed "ERROR" and nothing would work.  
After removing the thread from the motor pulley, I proceeded to look for a fuse that may have blown.
Opening up these machines can be frustrating.

The arrow points to the location of the fuse I found to be bad. Unfortunately, it was on the other side of this circuit board. These main boards have small plugs lined up all the way around them going to different parts of the machine. I really didn't want to unplug them all just to get to that fuse.
Taking out 4 screws gave me just enough room to get a new fuse in there.

The arrow points to the fuse on the back side of the main circuit board. There are actually 2 fuses side by side. Replacing that fuse got the machine back in working order.
So, How do I keep this from happening again?
I must block the vent but still allow air to pass through. This is what I came up with.
Good old duct tape. I stuck 2 pieces together so they wouldn't stick to anything and then taped that over the vent opening in a way that would still allow air to flow.


It seems to work fine. Only time will tell and if a problem does arise, it can be removed easily.
I am sure the owner of this machine doesn't want to pay for this repair again.